 amorta
Set up
1Create your account
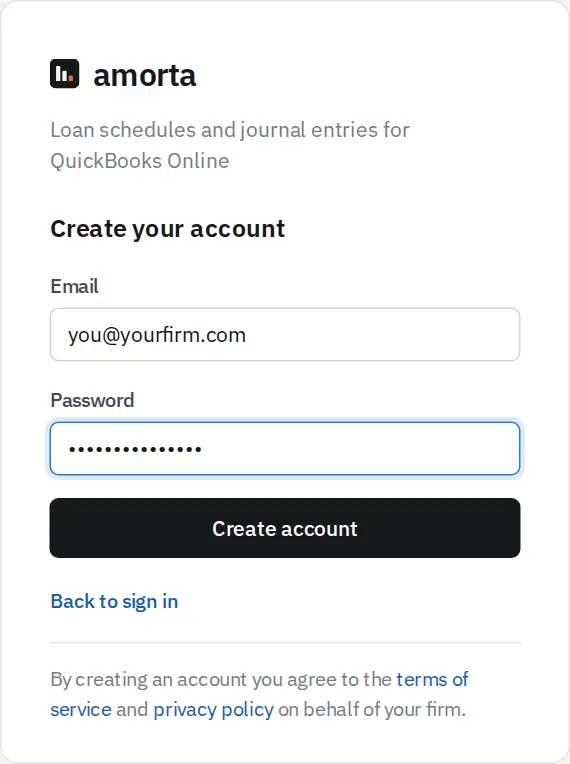
- Go to qbo.amorta.io and choose Create an account.
- Enter your work email and a password of at least 10 characters, then Create account.
- Open the confirmation email from Amorta and click Confirm email. No email after a minute? Check spam, or use Resend confirmation email on the sign-up page.
- Sign in with your email and password.
2Turn on two-step sign-in
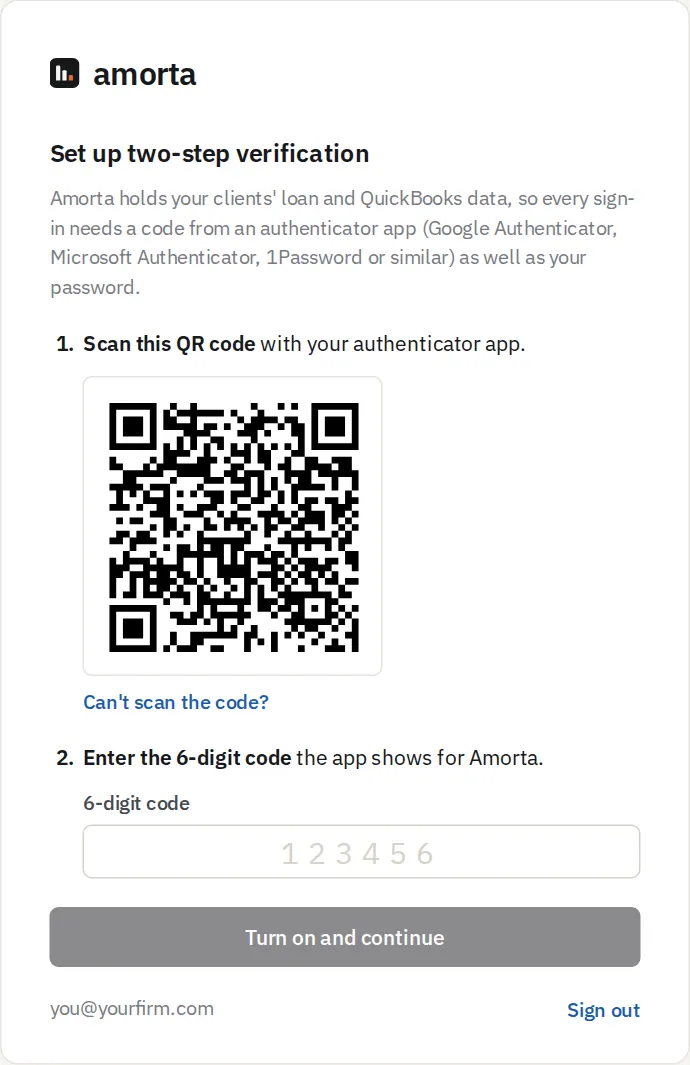
Amorta holds your clients' loan and QuickBooks data, so every sign-in needs a code from an authenticator app as well as your password. This is required for everyone on your team.
- Install an authenticator app on your phone if you don't have one: Google Authenticator, Microsoft Authenticator, 1Password or similar.
- In the app, add an account and scan the QR code Amorta shows. Can't scan? Choose Can't scan the code? and type the key instead.
- Enter the 6-digit code the app shows for Amorta and choose Turn on and continue.
3Set up your firm
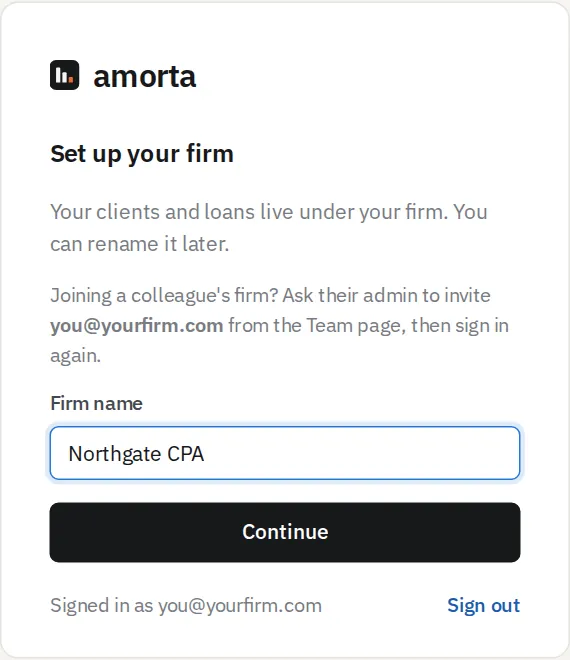
- Enter your firm's name (you can rename it later) and choose Continue.
- You're now the firm's owner: you manage the team and billing, and nobody can remove or lock you out.
4Add a client
- On All clients, choose Add client.
- Type the client's name as it appears in QuickBooks and choose Save.

5Connect the client's QuickBooks Online
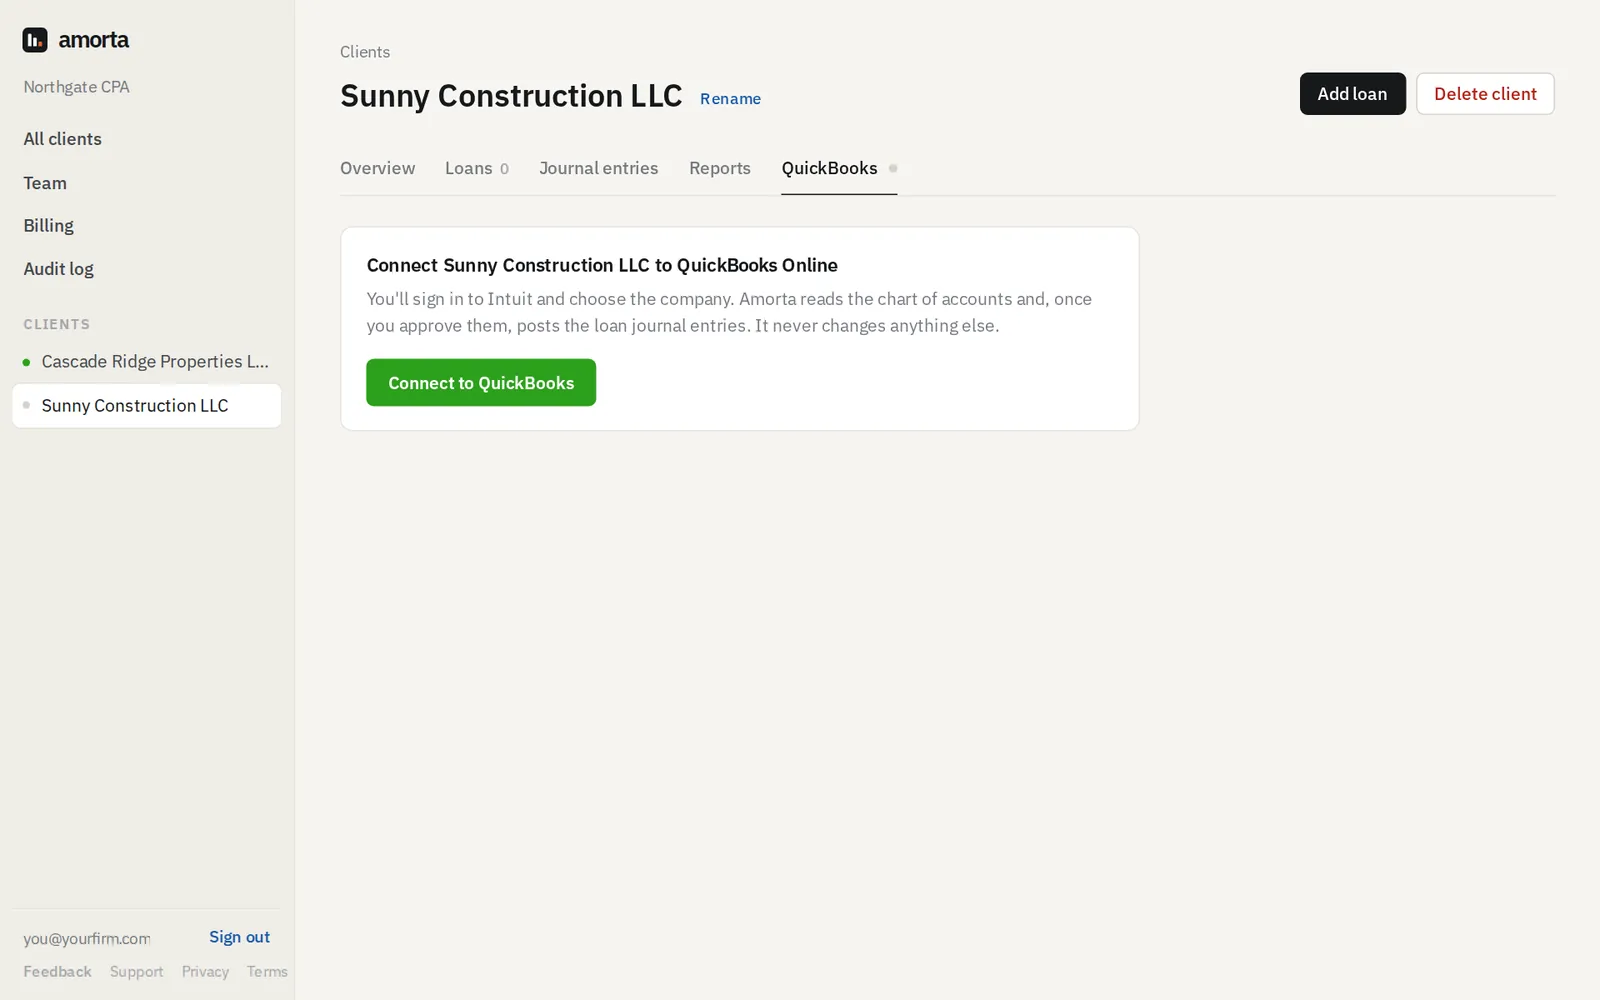
- Open the client and go to the QuickBooks tab.
- Choose Connect to QuickBooks. Intuit's sign-in opens.
- Sign in to QuickBooks and choose the client's company, then approve the connection.
- You're brought back to Amorta, which reads the company's chart of accounts. The tab now shows Connected and a green dot.
6Choose the default accounts
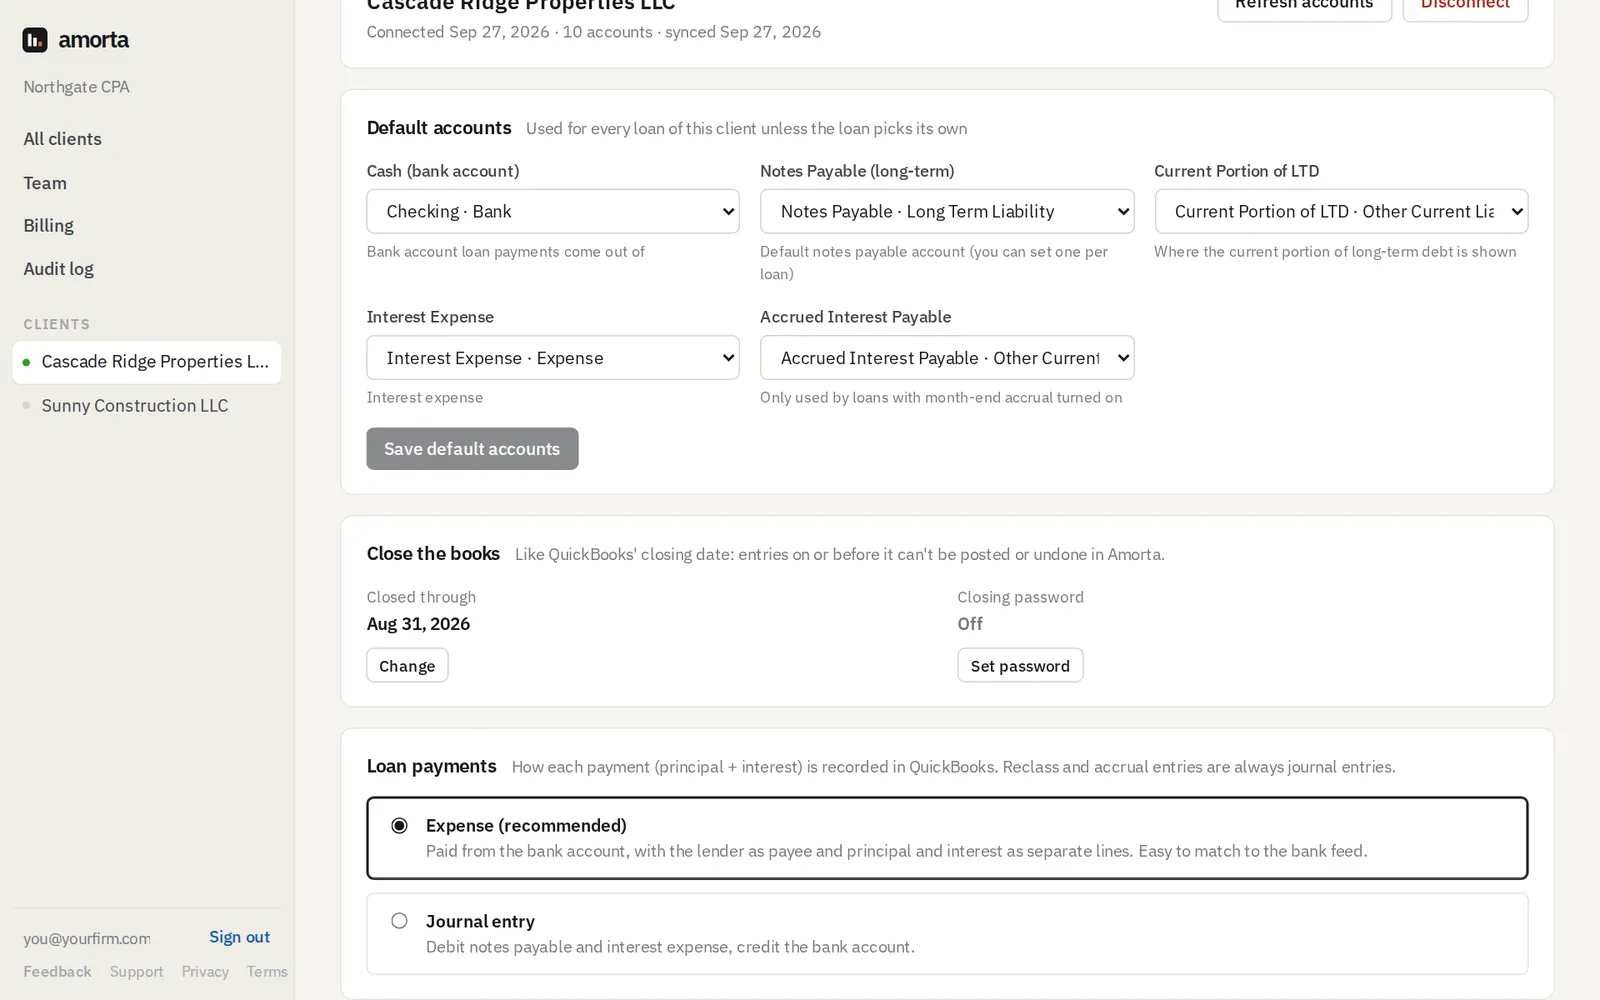
Still on the client's QuickBooks tab, pick the accounts every loan of this client uses unless a loan picks its own (step 10).
| Cash (bank account) | The bank account loan payments come out of. |
|---|---|
| Notes Payable (long-term) | The default long-term loan account. You can give each loan its own. |
| Current Portion of LTD | Where the principal due within 12 months is shown. Amorta trues it up every month. |
| Interest Expense | Where interest is expensed. |
| Accrued Interest Payable | Only needed for loans with month-end accruals turned on. |
- Pick each account from the list. The list shows QuickBooks account numbers and types.
- Missing one? Choose + New account in QuickBooks… at the bottom of the list, fill in the name, number and type as you would in QuickBooks, and choose Create in QuickBooks.
- Choose Save default accounts.
- Under Loan payments, choose how payments are recorded: Expense (recommended: paid from the bank with the lender as payee, easy to match to the bank feed) or Journal entry.
Add loans
7Add a loan
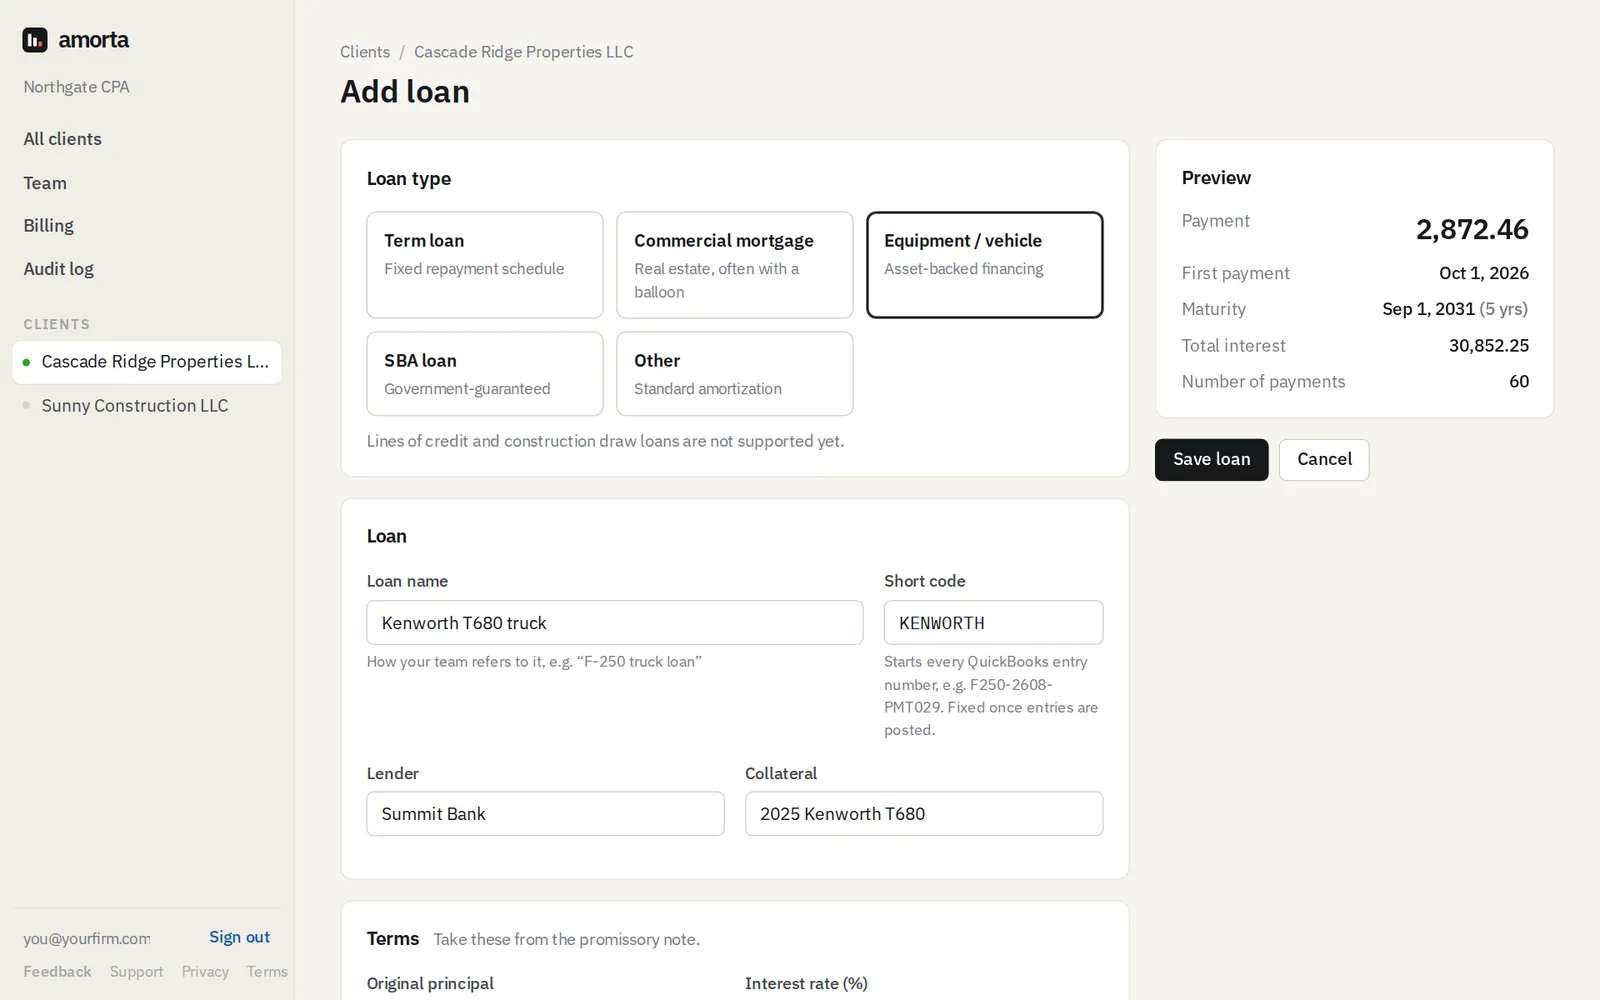
- Open the client and choose Add loan.
- Loan type: Term loan, Commercial mortgage, Equipment / vehicle, SBA loan or Other. Lines of credit and construction draw loans aren't supported yet.
- Loan: a name your team will recognise (e.g. "F-250 truck loan"), the lender and the collateral. The short code is suggested from the name; it starts every QuickBooks entry number (e.g.
F250-2609-PMT030) and is fixed once anything is posted.
Terms: take these from the promissory note.
| Original principal | The amount borrowed. |
|---|---|
| Interest rate (%) | The fixed rate on the note, e.g. 7.25. |
| Booking (funding) date | The day the loan was funded; interest starts here. |
| First payment date | Suggested as one month after funding; change it to match the note. |
| Day count | How interest days are counted: 30/360, Actual/360 or Actual/365. Most bank term loans are Actual/360; check the note. |
| Term (months) | Months until maturity (for a balloon mortgage: until the balloon is due). |
| Payment per the note | Optional. Leave blank to calculate; if you enter it and it differs from the calculation, Amorta warns you and uses the note's payment. |
| Balloon or interest-only | Choose + Balloon or interest-only period to enter the amortization months (e.g. 300 for a 10-year note on 25 years) or interest-only months. |

8Booking entry, accruals and documents
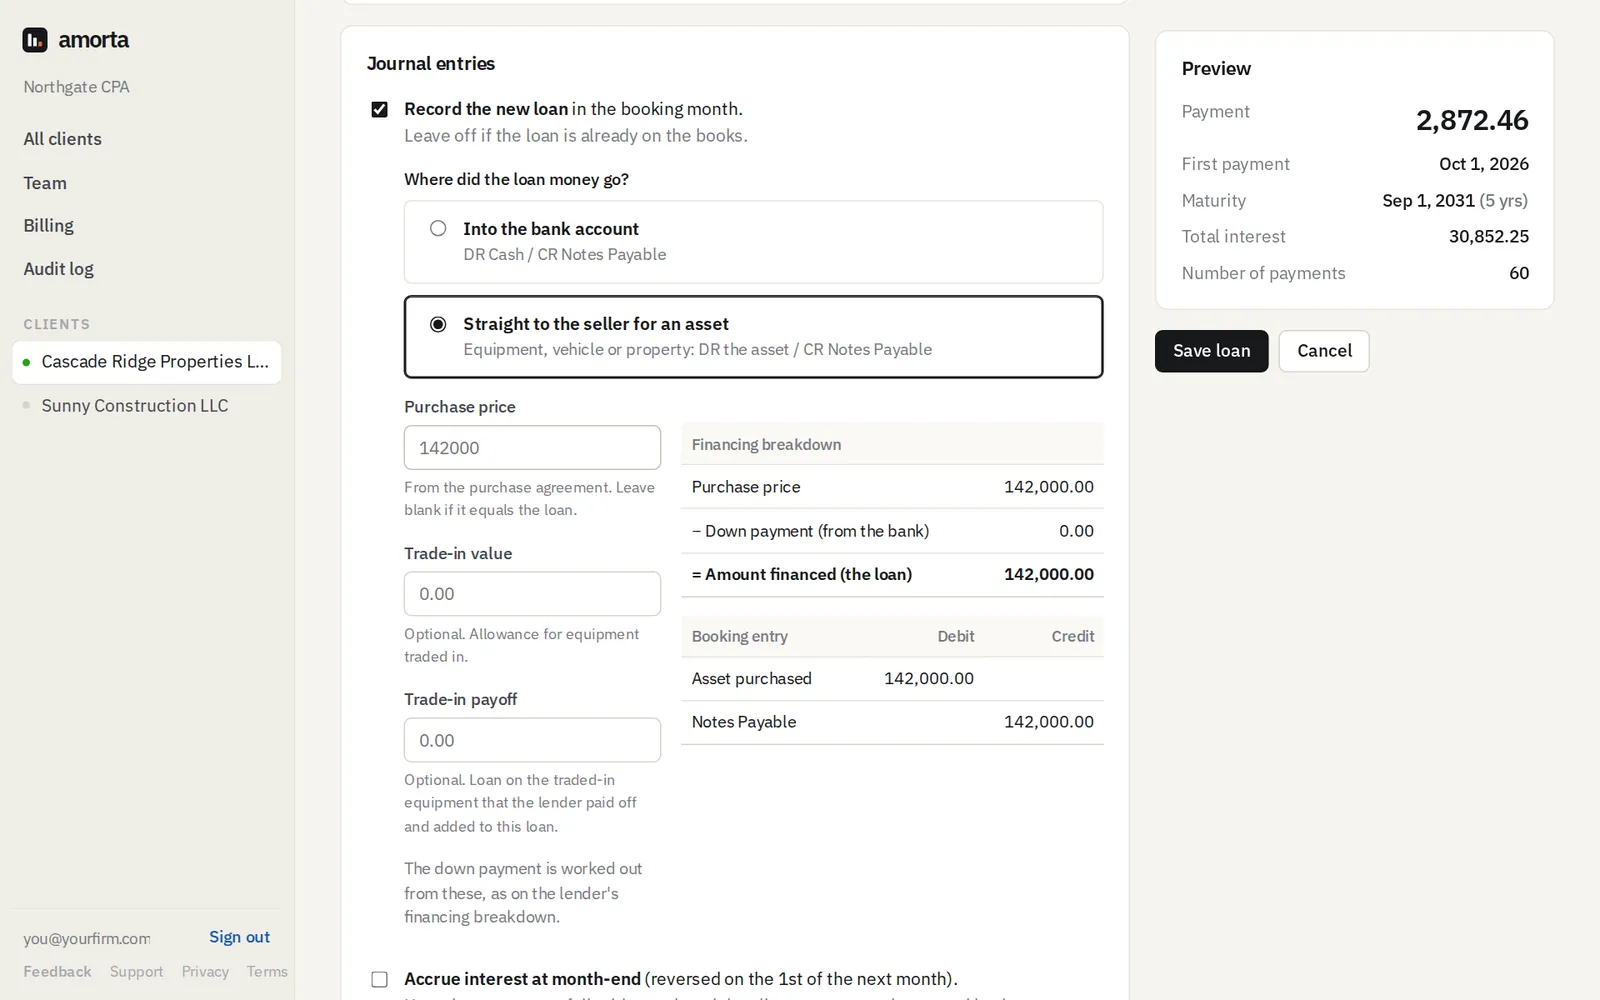
- Record the new loan: tick it for a new loan so Amorta posts the booking entry in the funding month. Leave it off if the loan is already on the client's books.
- Into the bank account: DR Cash / CR Notes Payable.
- Straight to the seller for an asset (equipment, vehicle, property): DR the asset / CR Notes Payable. Enter the purchase price, and any trade-in value and trade-in payoff; Amorta works out the down payment and shows the full entry.
- Accrue interest at month-end: for loans whose payments fall mid-month when the client reports on the accrual basis. The accrual is reversed on the 1st of the next month.
- Documents: attach the note, the lender's schedule or statements (PDF, images, Word or Excel, up to 25 MB each). They stay with the loan.
Then choose Save loan.
9Check the schedule
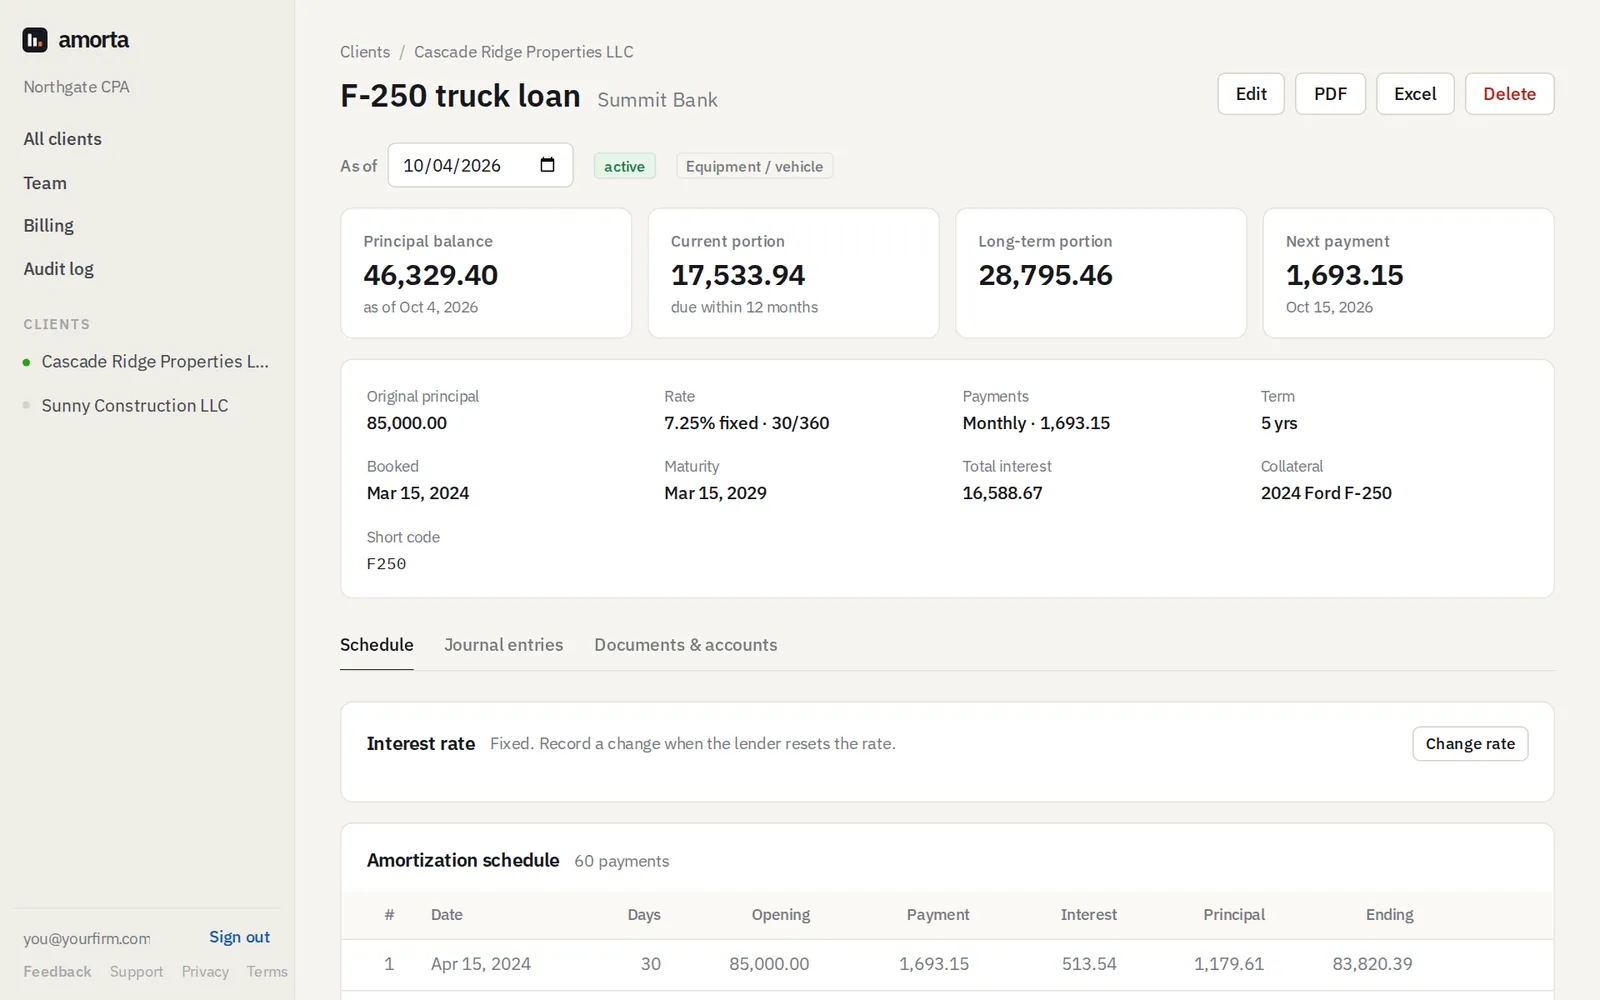
- After saving, the loan page shows the principal balance, current portion, long-term portion and next payment as of today. Change As of to see any other date.
- Compare the Amortization schedule with the lender's schedule or latest statement. If it doesn't match, choose Edit and check the day count, first payment date and payment.
- Download the schedule with PDF or Excel for your workpapers.
10Loan accounts and documents
On the loan's Documents & accounts tab:
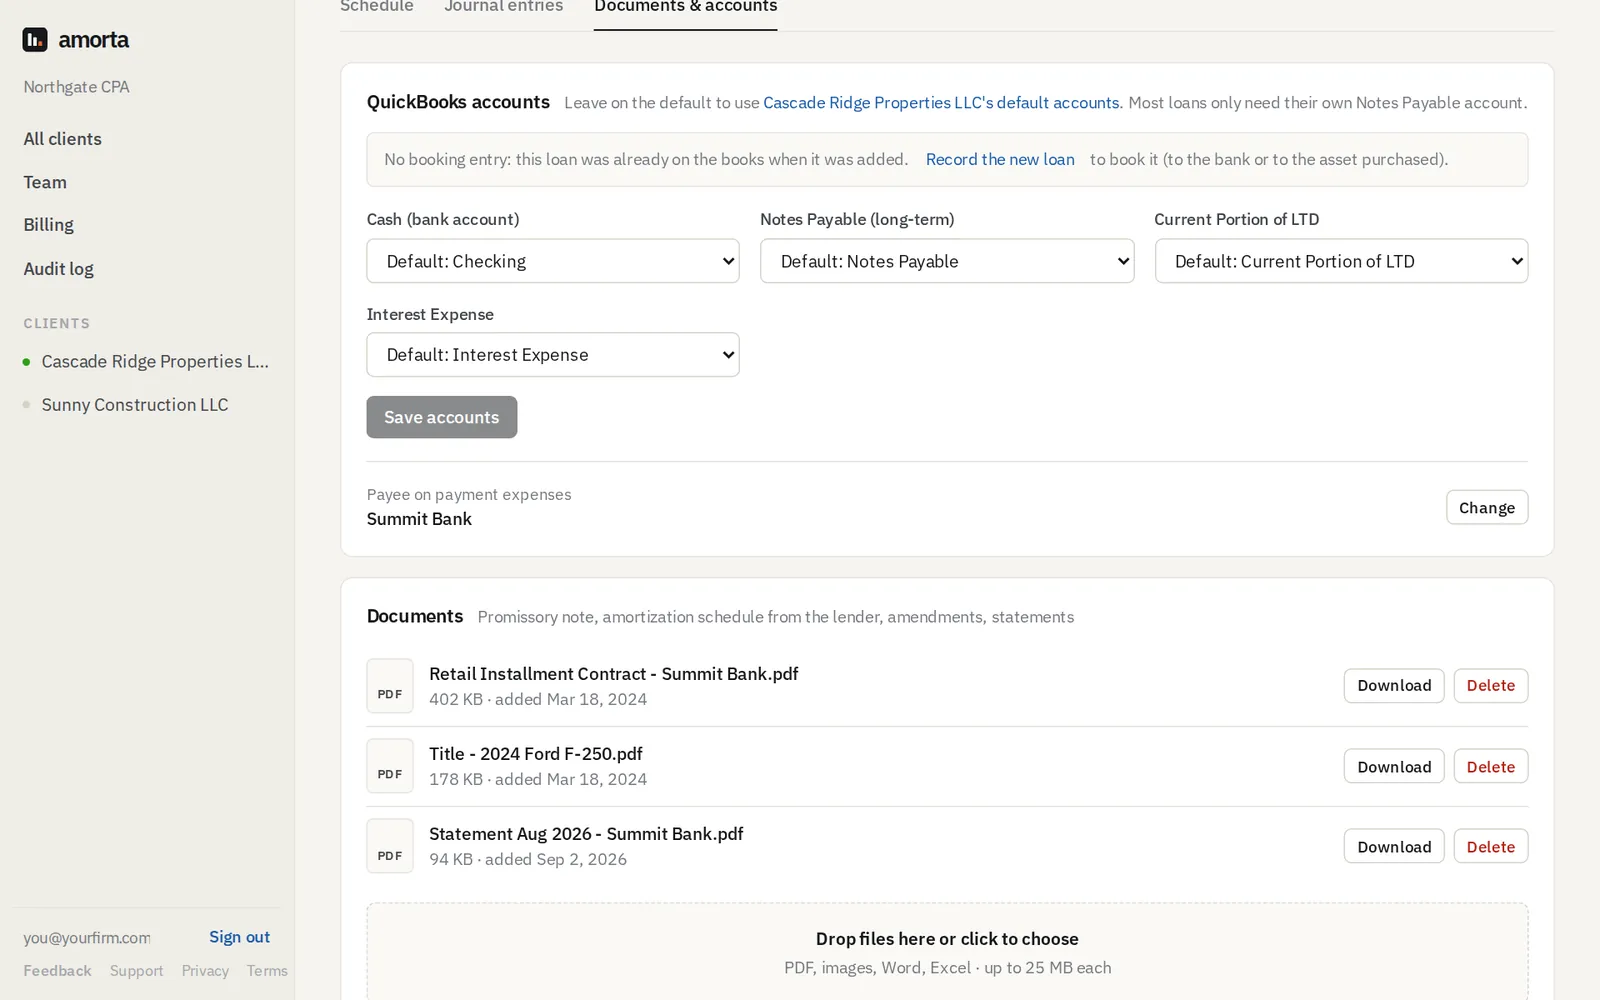
- QuickBooks accounts: leave them on the client's defaults, or pick this loan's own accounts. Most loans only need their own Notes Payable account. Choose Save accounts.
- Payee on payment expenses: the lender as a QuickBooks vendor. Change it if the client pays a servicer instead.
- Documents: open, download or delete files, or drop new ones in.
11Record a rate change
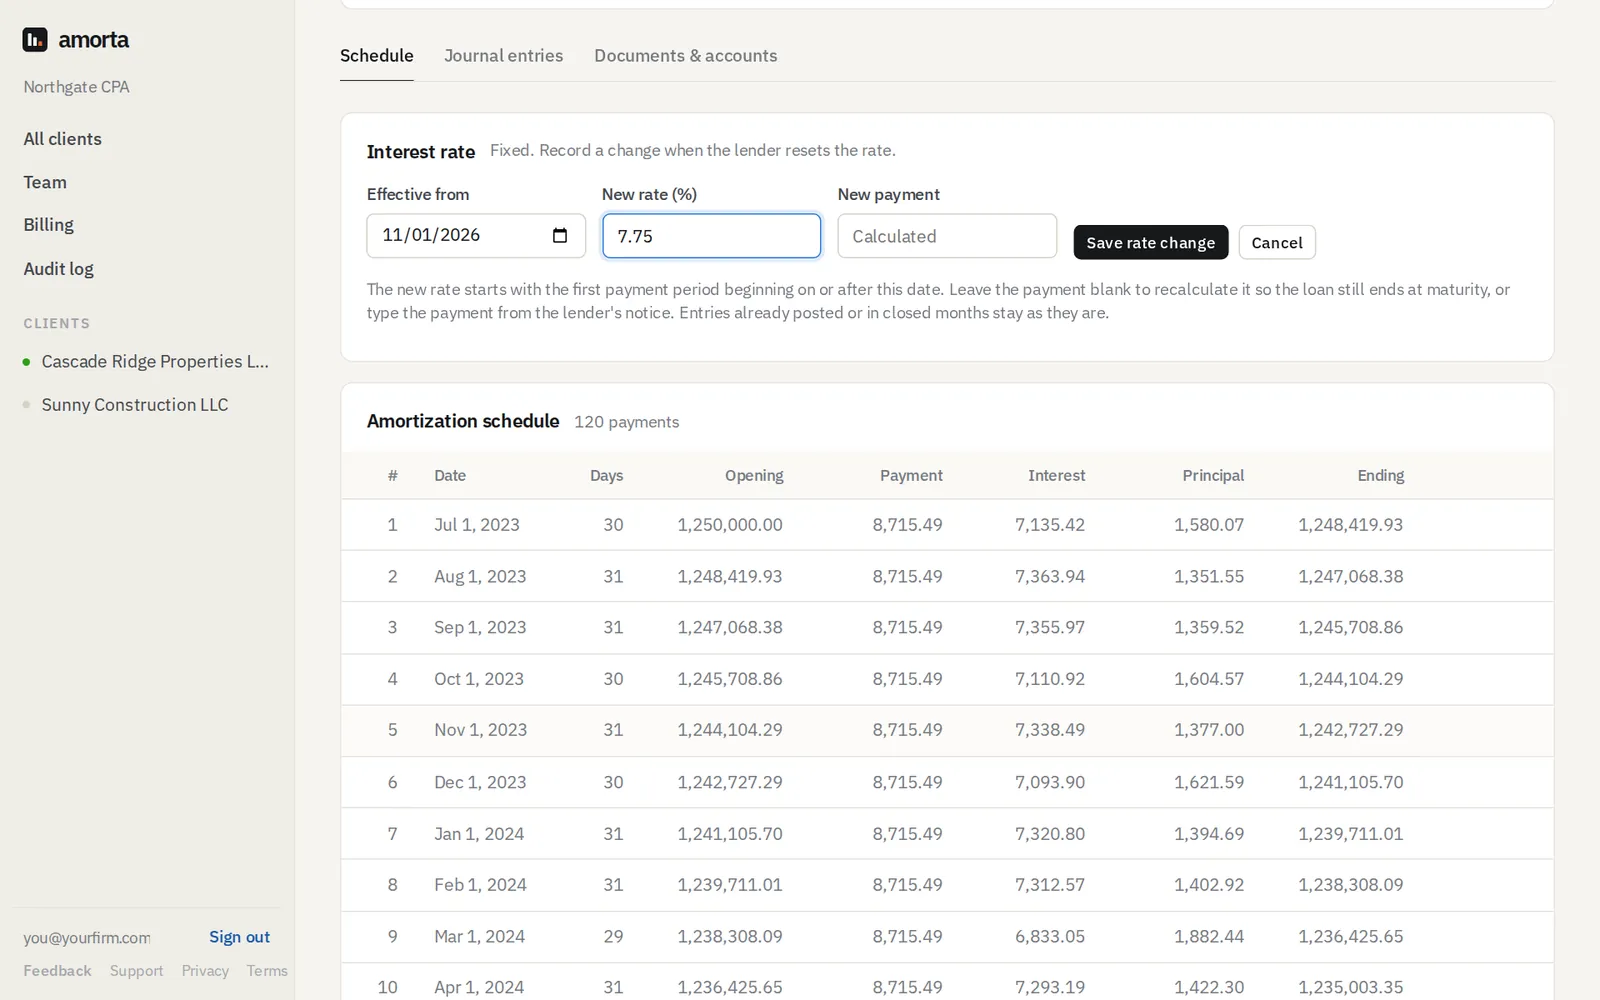
- On the loan's Schedule tab, choose Change rate.
- Enter the date it's effective from and the new rate. Leave New payment blank to recalculate it so the loan still ends at maturity, or type the payment from the lender's notice.
- Choose Save rate change. The new rate starts with the first payment period beginning on or after the date, and the schedule marks it New rate.
Every month
12Review the month
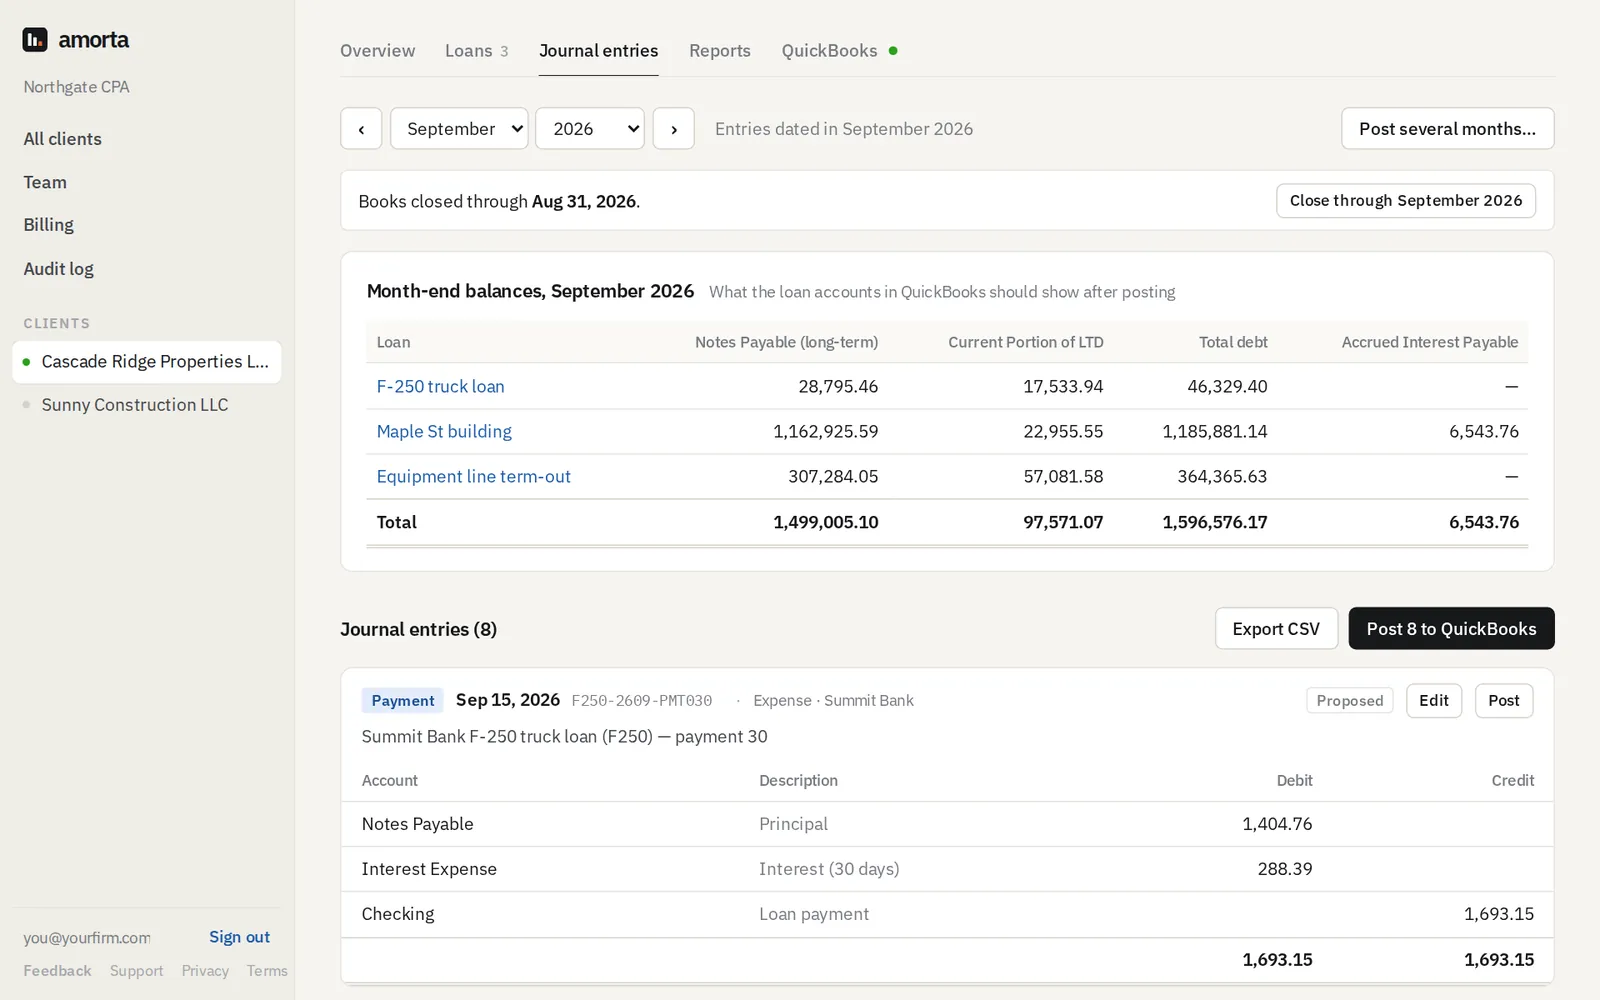
- Open the client and go to Journal entries. Pick the month with the arrows or the month and year lists.
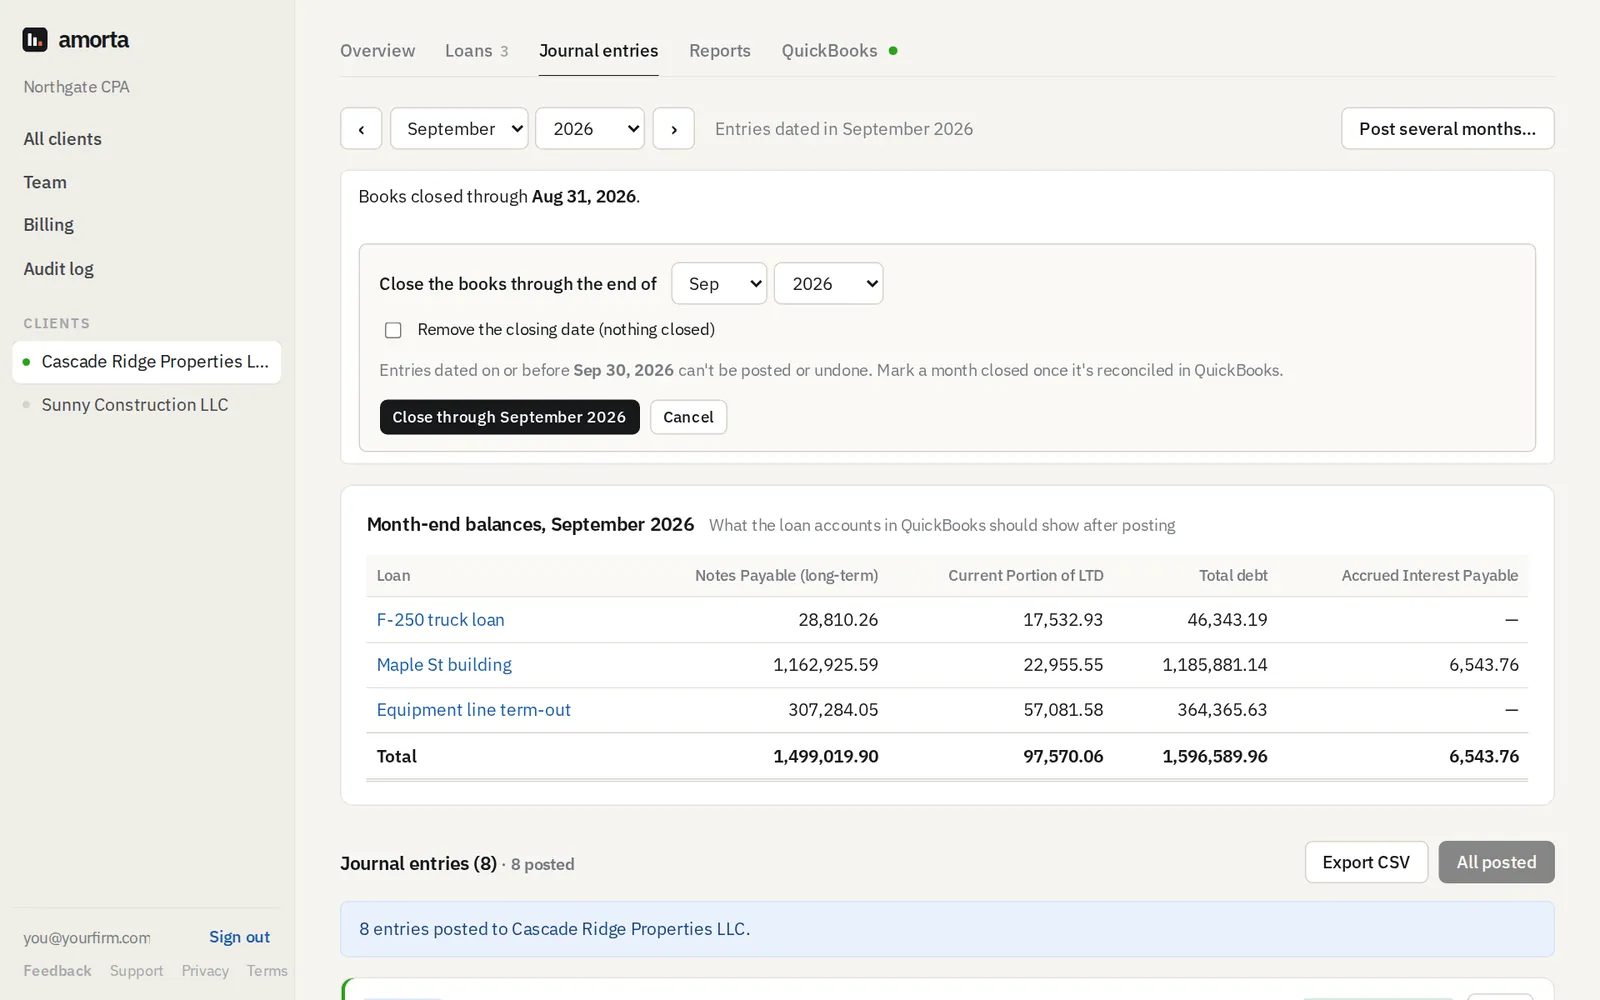
- Month-end balances shows what each loan account in QuickBooks should show once the month is posted: long-term, current portion, total debt and accrued interest. Use it to tie out to QuickBooks.
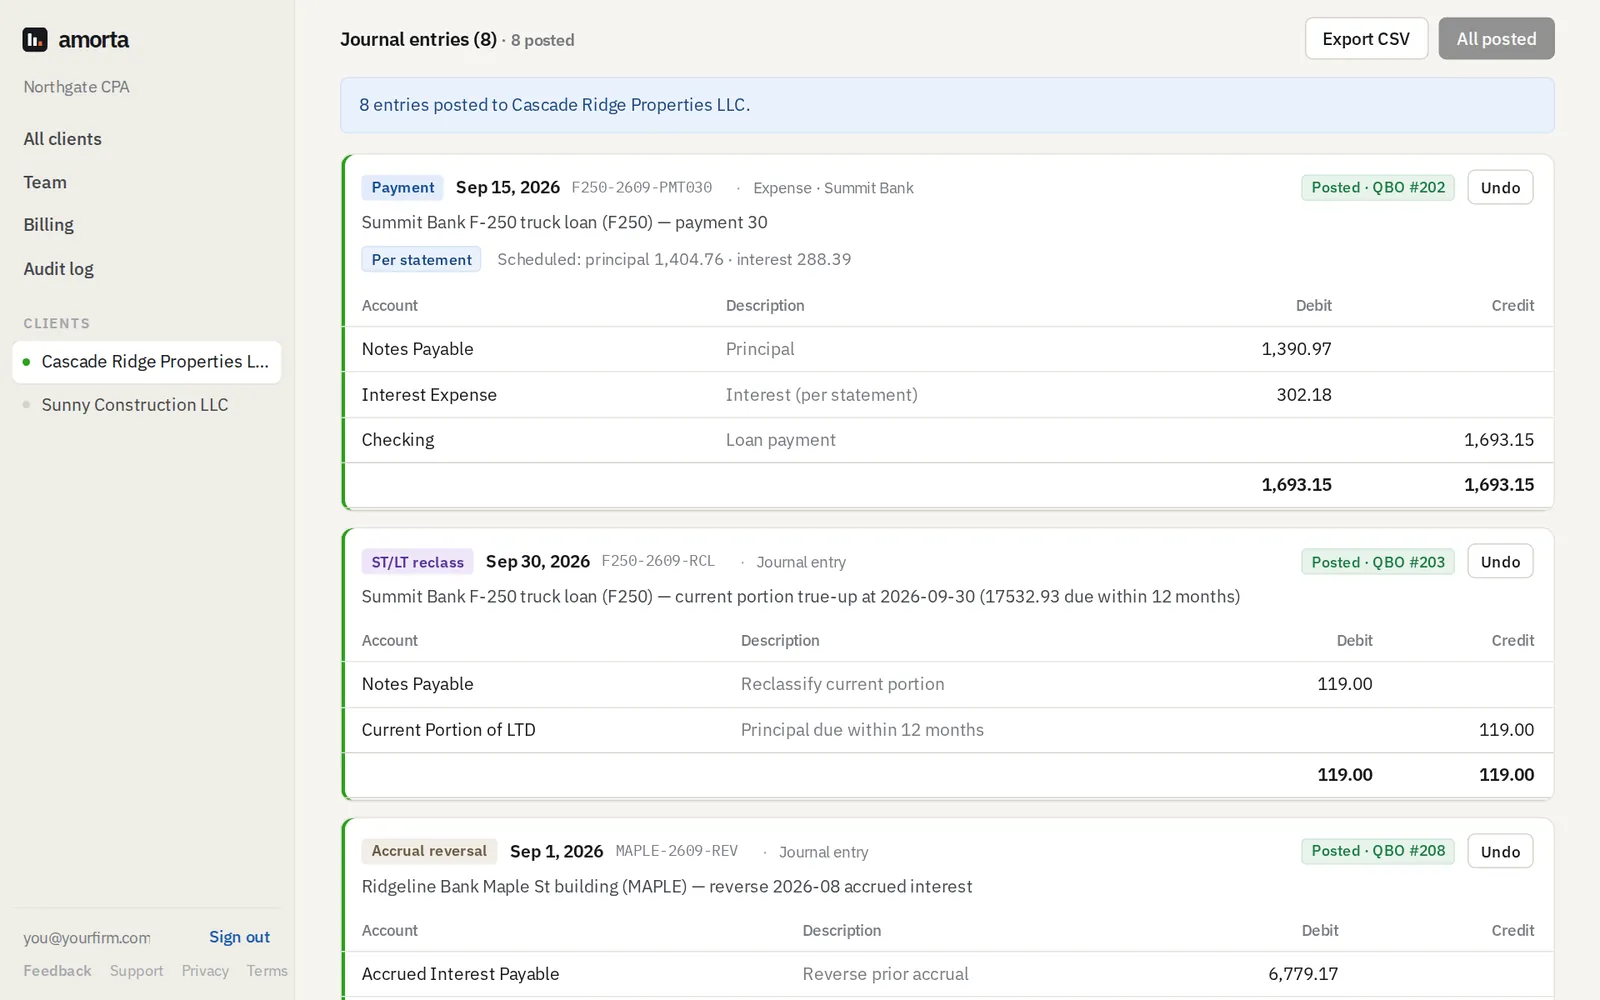
- Below are the month's entries for all the client's loans, each with its lines, date and number. Each type has its own colour:
- Payment: principal and interest, as an expense or journal entry (step 6).
- ST/LT reclass: the month-end true-up of the current portion of long-term debt.
- Accrued interest and Accrual reversal: for loans with accruals on.
- Booking: the new-loan entry, in the funding month.

13When the lender's statement differs
Banks sometimes split a payment differently from the schedule (a different day count, a late payment, a fee). Make Amorta follow the statement:
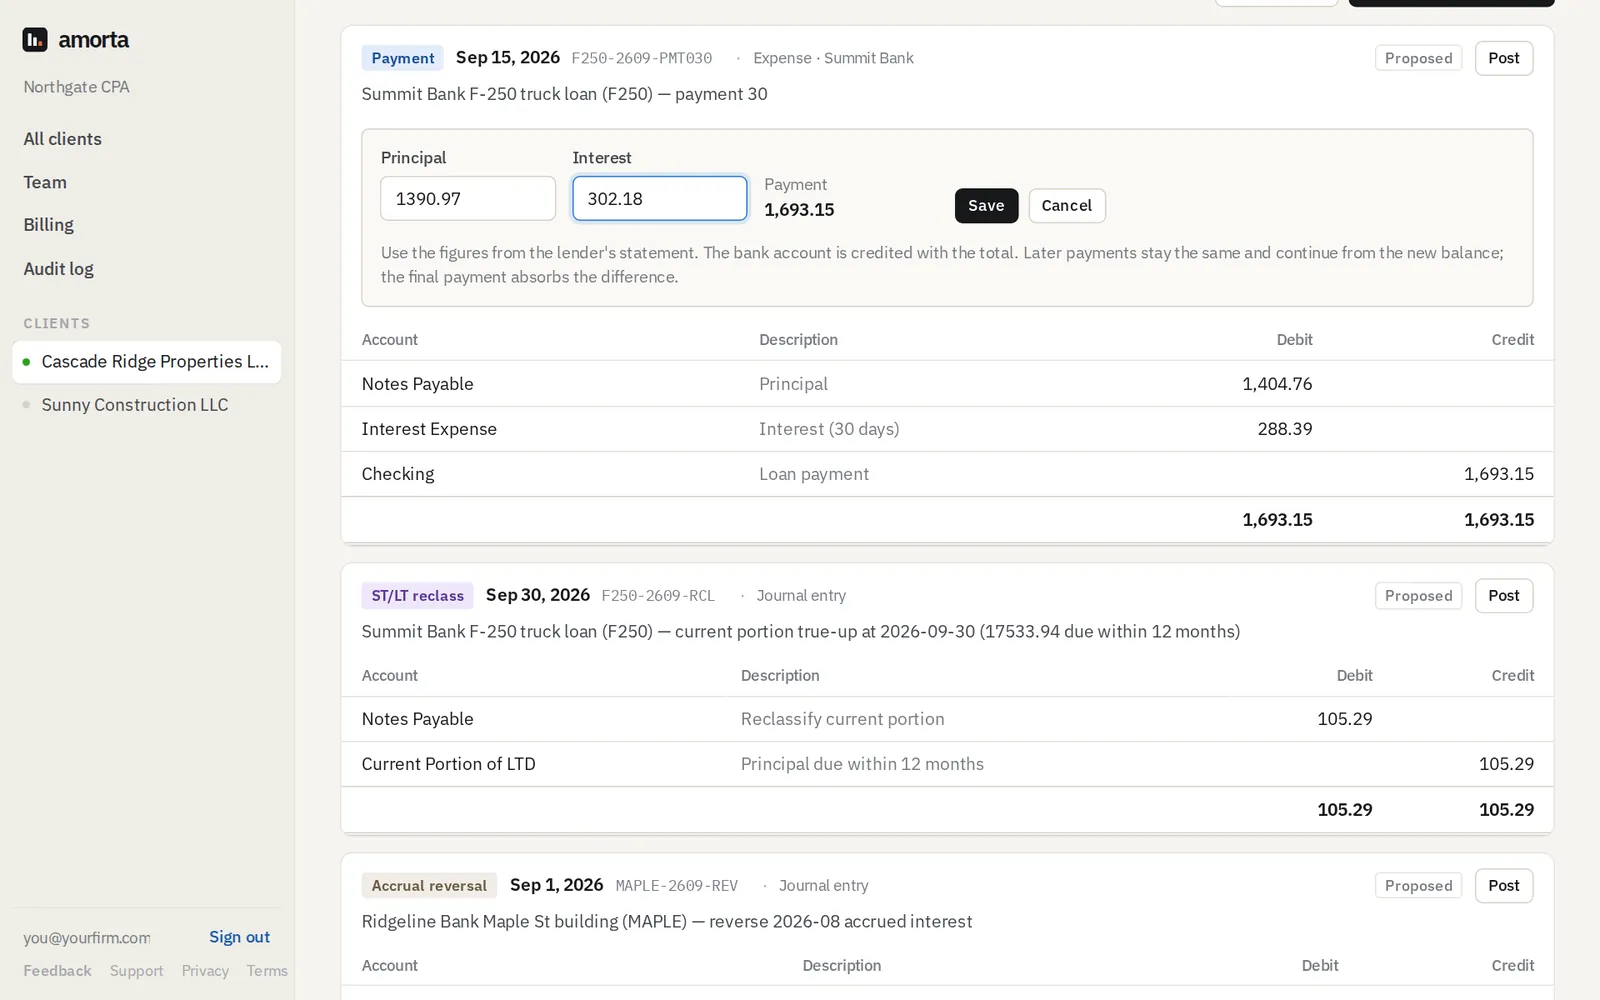
- On the payment entry, choose Edit (available until it's posted and while the month is open).
- Type the principal and interest from the lender's statement. The payment total updates as you type.
- Choose Save. The entry shows Per statement with the scheduled figures beside it. Later payments continue from the actual balance, and the final payment absorbs the difference.
14Post to QuickBooks
- When the entries look right, choose Post N to QuickBooks to post the whole month, or Post on a single entry.
- Posted entries turn green and show their QuickBooks number. Open them in QuickBooks like any other transaction.
- Posted something by mistake? Undo deletes that entry from QuickBooks.
15Close the month
Once the month is reconciled in QuickBooks, close it in Amorta, like QuickBooks' closing date.
- On the Journal entries tab, choose Close through [month].
- Check the month and year and choose Close through [month] again.
Reports and your firm
16Year-end reports
- Open the client and go to Reports.
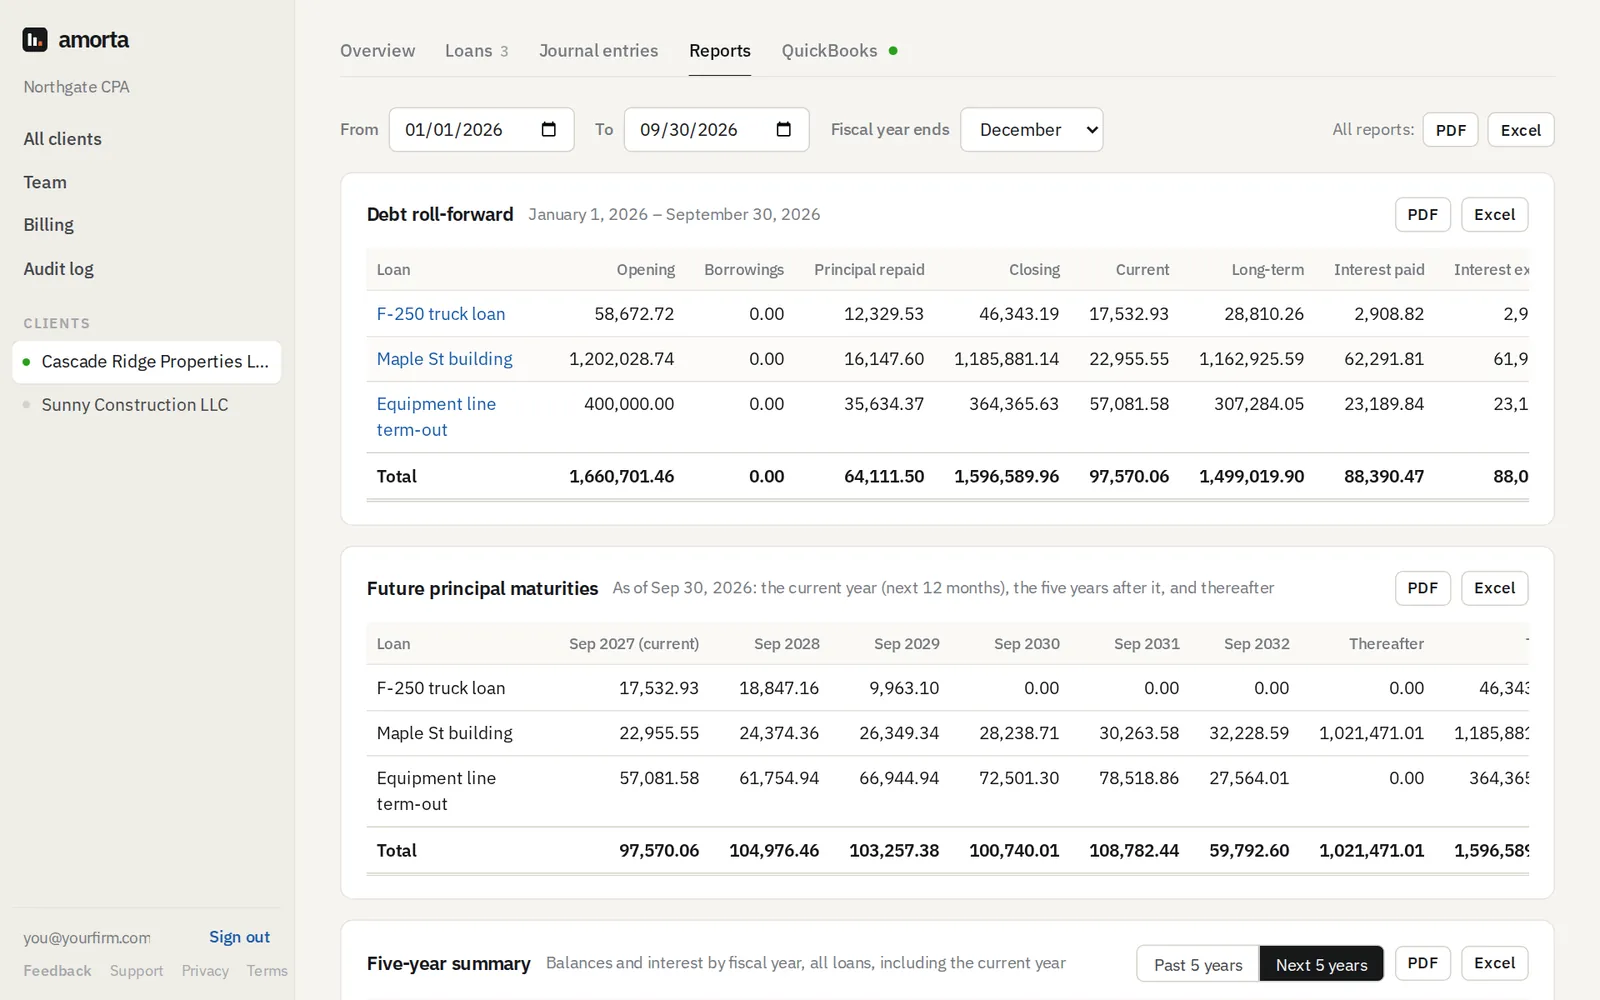
- Set From and To (the default is the fiscal year to date) and the month the client's Fiscal year ends.
- Download each report as PDF or Excel, or everything at once with All reports. They're laid out like QuickBooks reports: client, report name and period at the top, totals ruled.
| Debt roll-forward | Opening balance, borrowings, principal repaid, closing balance, current and long-term portion, interest paid and expensed, per loan. |
|---|---|
| Future principal maturities | The current year (next 12 months), the five years after it, and thereafter: the debt maturity note. |
| Five-year summary | Balances and interest by fiscal year, past or next five years. |
| Cash flow | Loan proceeds and principal repaid for the period, for the statement of cash flows. |
| Upcoming payments | What's due in the next 30, 60 or 90 days. |
17Client overview
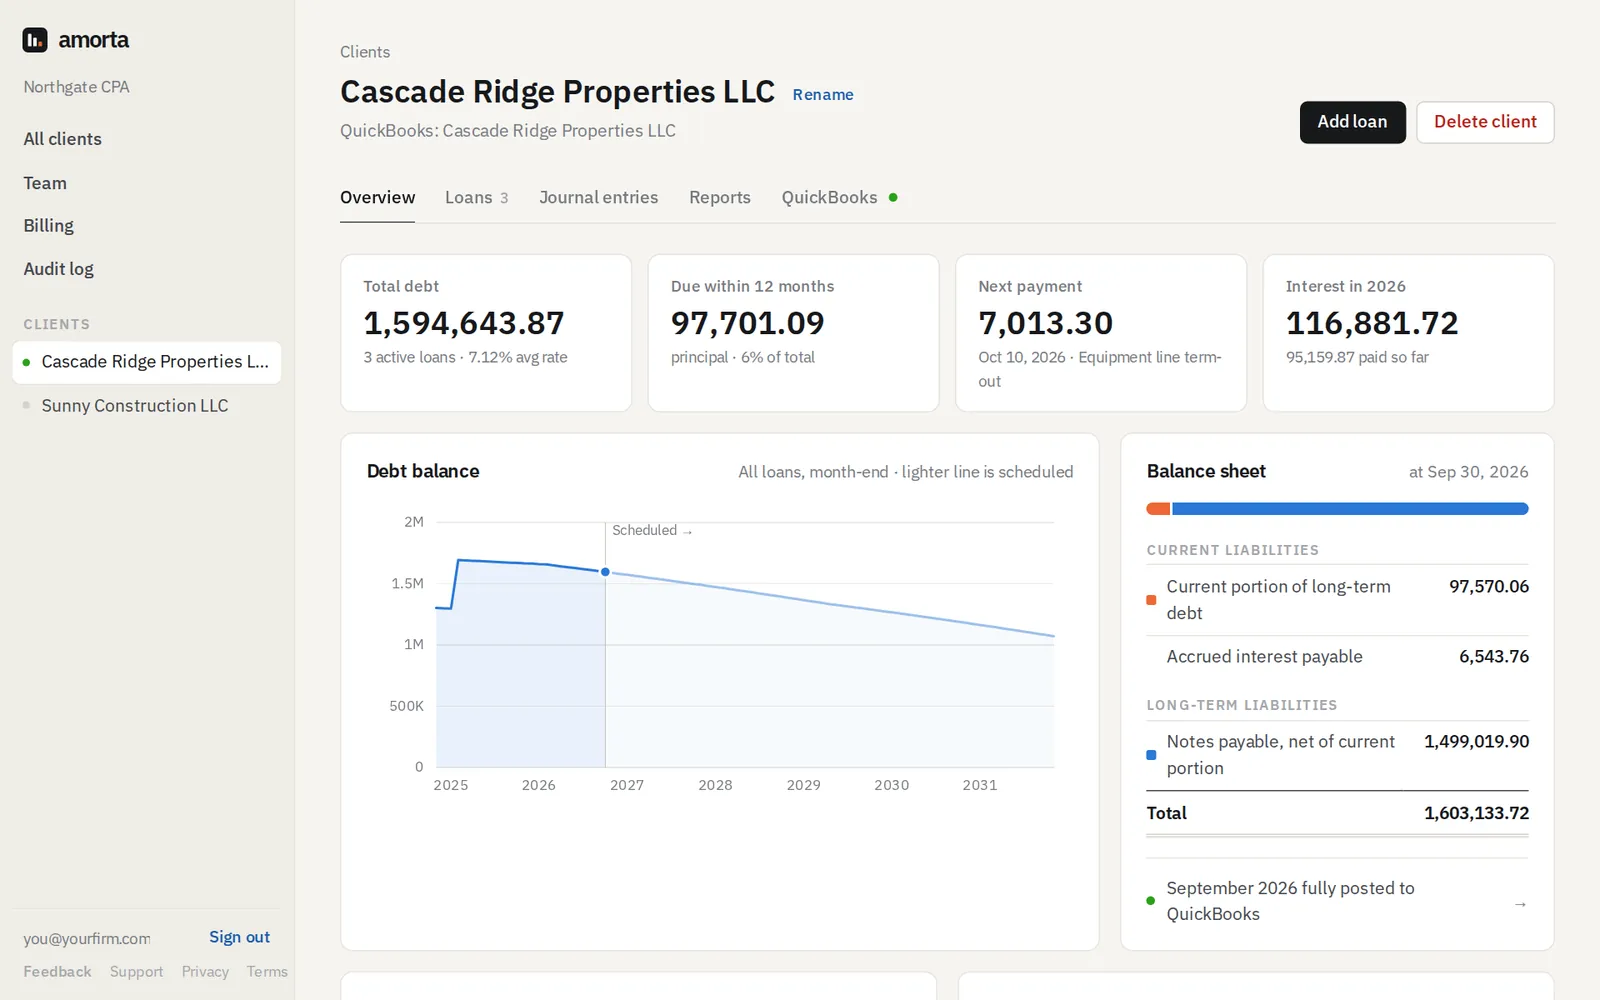
Each client's Overview tab is its dashboard: what needs attention (unposted entries, maturities and balloons coming up), total debt, what's due within 12 months, the next payment, interest this year, the debt balance over time, the balance sheet split and the payments due in the next 60 days.
18Team and security
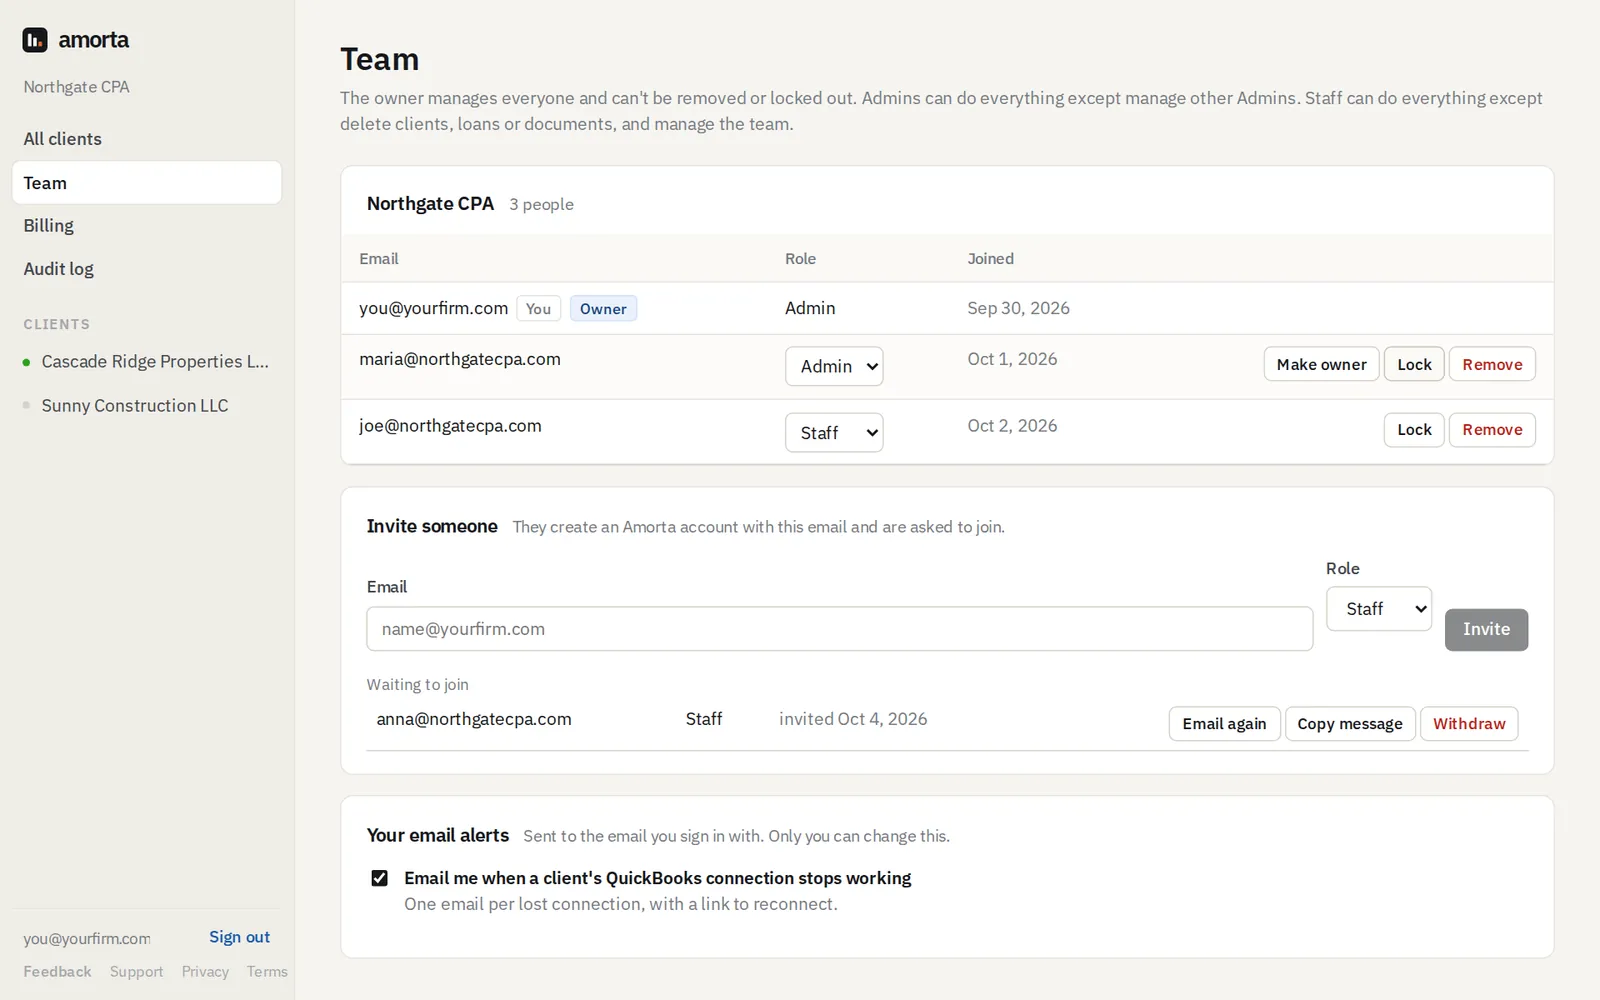
- Go to Team and invite colleagues by email as Staff (everything except deleting clients, loans or documents, and managing the team) or, if you're the owner, Admin.
- They get an email, create an account with that address, set up two-step sign-in and join your firm.
- Someone leaving? Lock stops their access at once and keeps their history; Unlock brings them back. Remove takes them off the team for good.
- The owner can hand the firm to another Admin with Make owner.
- Under Your email alerts, each person chooses whether to get an email when a client's QuickBooks connection stops working.
19Billing and the audit log
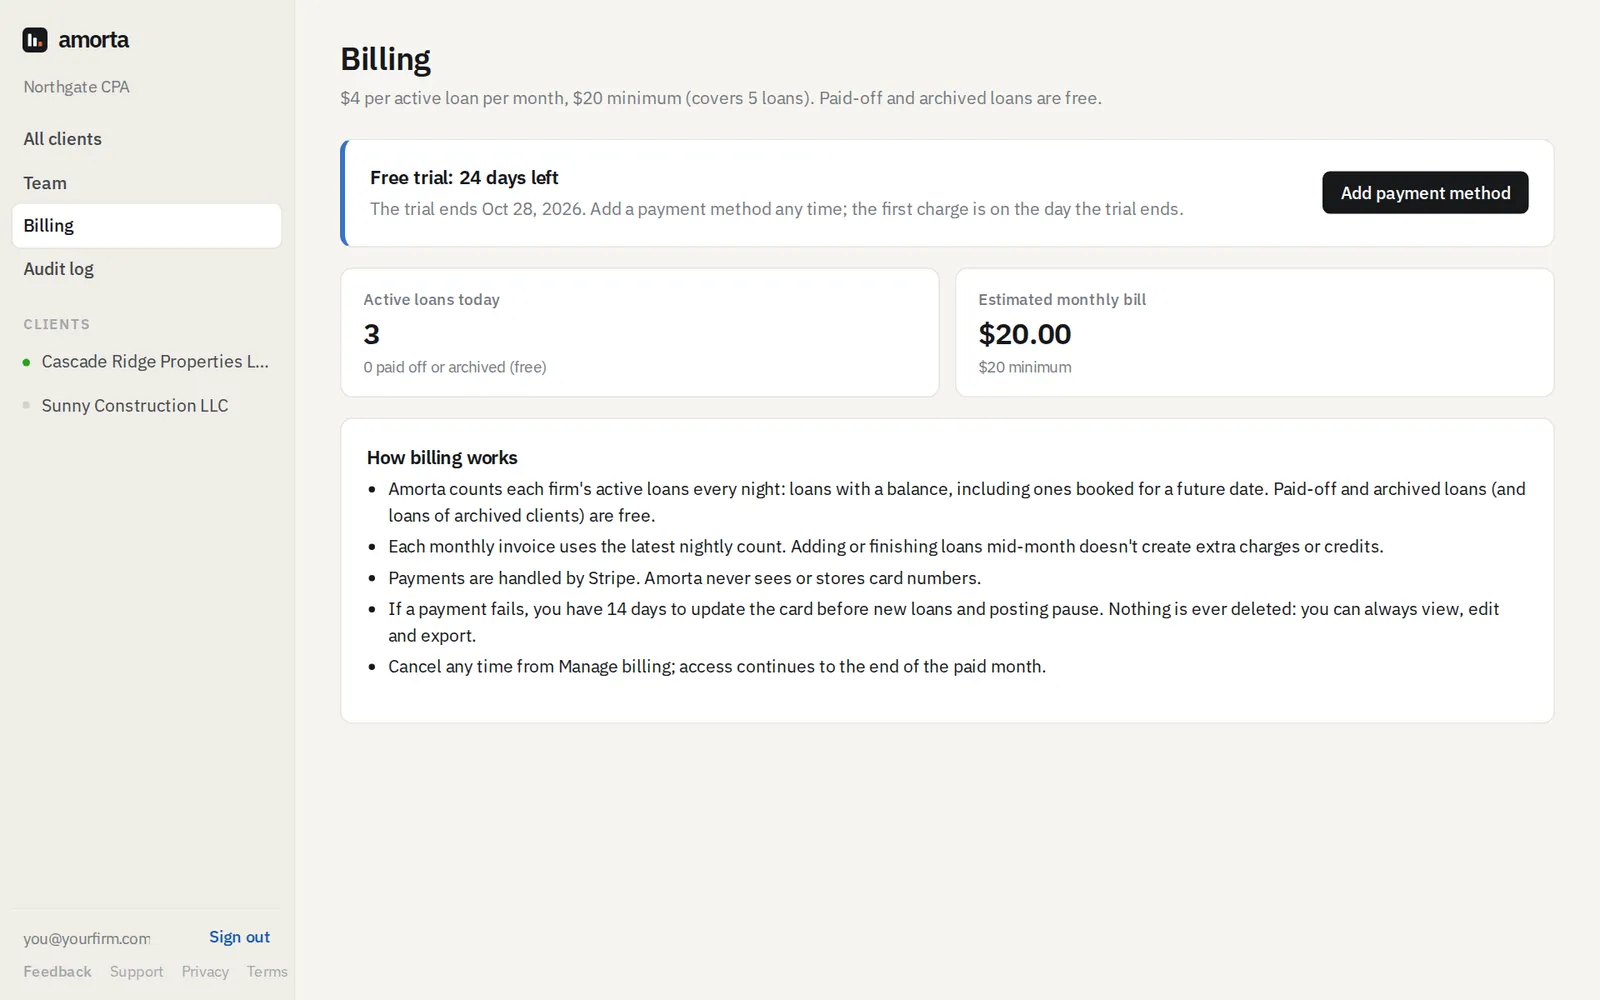
- Billing (Admins): the trial lasts 30 days. Then it's $4 per active loan a month with a $20 minimum; paid-off and archived loans are free. Choose Add payment method to subscribe through Stripe; change the card, see invoices or cancel from the same page.
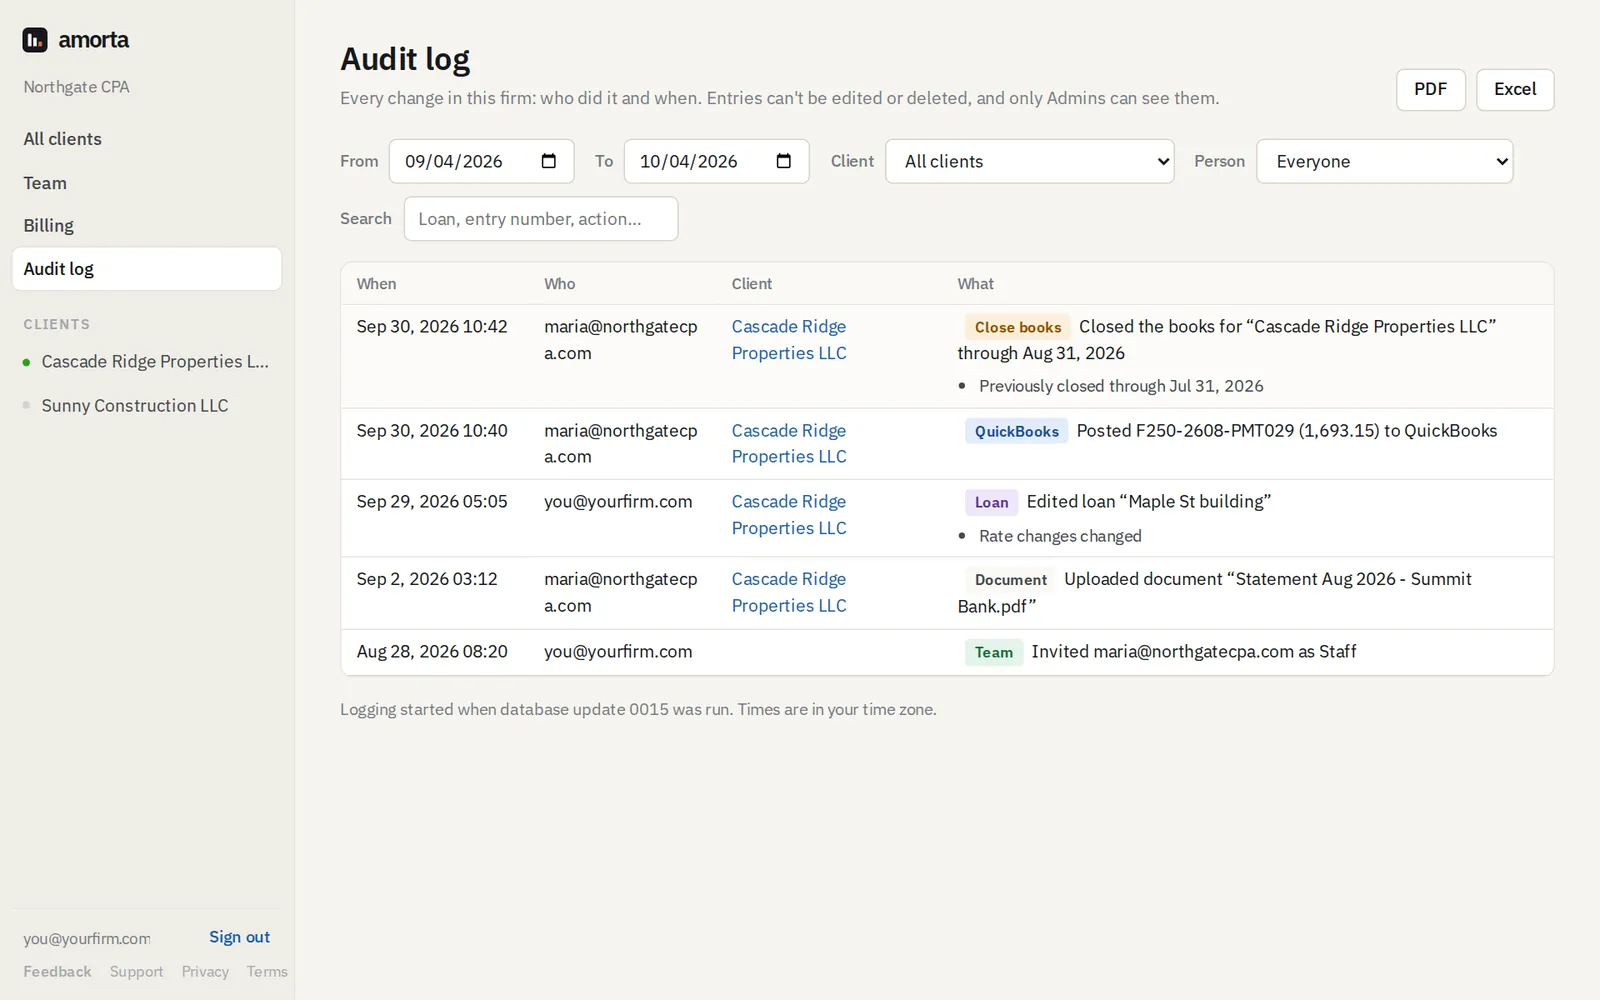
- Audit log (Admins): every change in the firm, who made it and when, with filters by date, client and person. It can't be edited or deleted, and downloads as PDF or Excel.
Questions, or want a hand with your first loan?
Use Feedback at the bottom of Amorta's sidebar, email agarcia@amorta.io, or book 30 minutes and we'll set up one of your own loans together.